Meta Ads Manager Tutorial for eCommerce Ads [Beginners Edition]
Meta Ads Manager powers millions of Facebook and Instagram ad campaigns, yet many eCommerce brands still rely on the boost button. This beginner tutorial explains how to create campaigns, define audiences, set budgets, and track results using Meta Ads Manager to run more profitable ads in 2026.


![Meta Ads Manager Tutorial for eCommerce Ads [Beginners Edition]](https://honest-garden-2954e8e7e9.media.strapiapp.com/meta_ads_manager_thumbnail_b0a202570b.png)
We wouldn't blame you for thinking of Meta Ads Manager as some mystical black box only marketing wizards know how to use.
However, if you want to run effective, high-performing Facebook or Instagram ads, this is the tool you need to get comfortable with.
It’s free, and millions of your competitors are already using it to turn ad spend into revenue for their eCommerce stores.
This guide is your beginner-friendly walkthrough of Meta Ads Manager in 2026. It's built to help you learn the basics and start running better ads.
Key takeaways
- Meta Ads Manager gives you complete campaign control. You can precisely target audiences, set conversion events, manage budgets across ad sets, and run A/B tests to optimize performance.
- Broad interest-based audiences perform better than narrow targeting since Meta's algorithm needs more data to optimize your ads.
- Meta reviews new ads within 1-24 hours; editing published ads sends them back through review.
What is Meta Ads Manager?
Meta Ads Manager helps you create and set up your ads on the Meta ecosystem. This tool also lets you view running ads, make edits, and see results for all your campaigns, ad sets, and ads.
If you want to run ads on Facebook and the rest of the Meta ecosystem, Meta Ads Manager is a must-use tool.
Why?
Facebook ads are still a major strategy in digital marketing, with 10 million active advertisers on the platform. In that case, hitting the boost button on your Facebook post won’t give you an edge over the millions of advertisers active on Facebook.
A more comprehensive platform, such as Meta Ads Manager, will be more effective in the long term.
If you do make the investment in mastering this platform, you’re more likely to be in the camp of 40% of businesses that consider Facebook their most profitable ad platform.
It’s a free tool, so the only investment in learning Meta Ads Manager is your time.
What can you do with Meta Ads Manager?
- Create your ads: You can set up campaigns that match your goals, whether that's getting people to your website, filling out a form, or buying something. You can also choose your images, write your copy, pick where people go when they click, and decide exactly who sees your ads.
- View ads performance: How many people saw your ad? How many clicked? How many bought something? Which cities are converting best? What age group is ignoring you completely? Meta Ads Manager answers all these questions with cold, hard numbers.
- Create A/B tests: If you want to see how one creative performs against another or how two different copies or headlines would perform, this is the tool to use.
- Budget management: Decide how much to spend on each campaign, set daily limits, and channel money toward working ads. You can even tell Meta to automatically pump more of the budget into your best-performing ads.
Accessing Facebook Ads Manager
You have a few different ways to access this ads management tool.
1. Via your Facebook business page
When logged into Facebook, go to your business page and look at the left sidebar. You'll see an option that takes you directly to Ads Manager. This method keeps everything connected to the profile you're already using, so no extra logins or account switching.
2. Use the app
The Meta Ads Manager app is available in the App Store and the Google Play Store. It works similarly to the web browser because you can create, edit, and monitor ads in real time on your mobile phone, wherever you are.
If you’d rather skip the above two methods, use this link to take you there directly: https://www.facebook.com/ads/manager
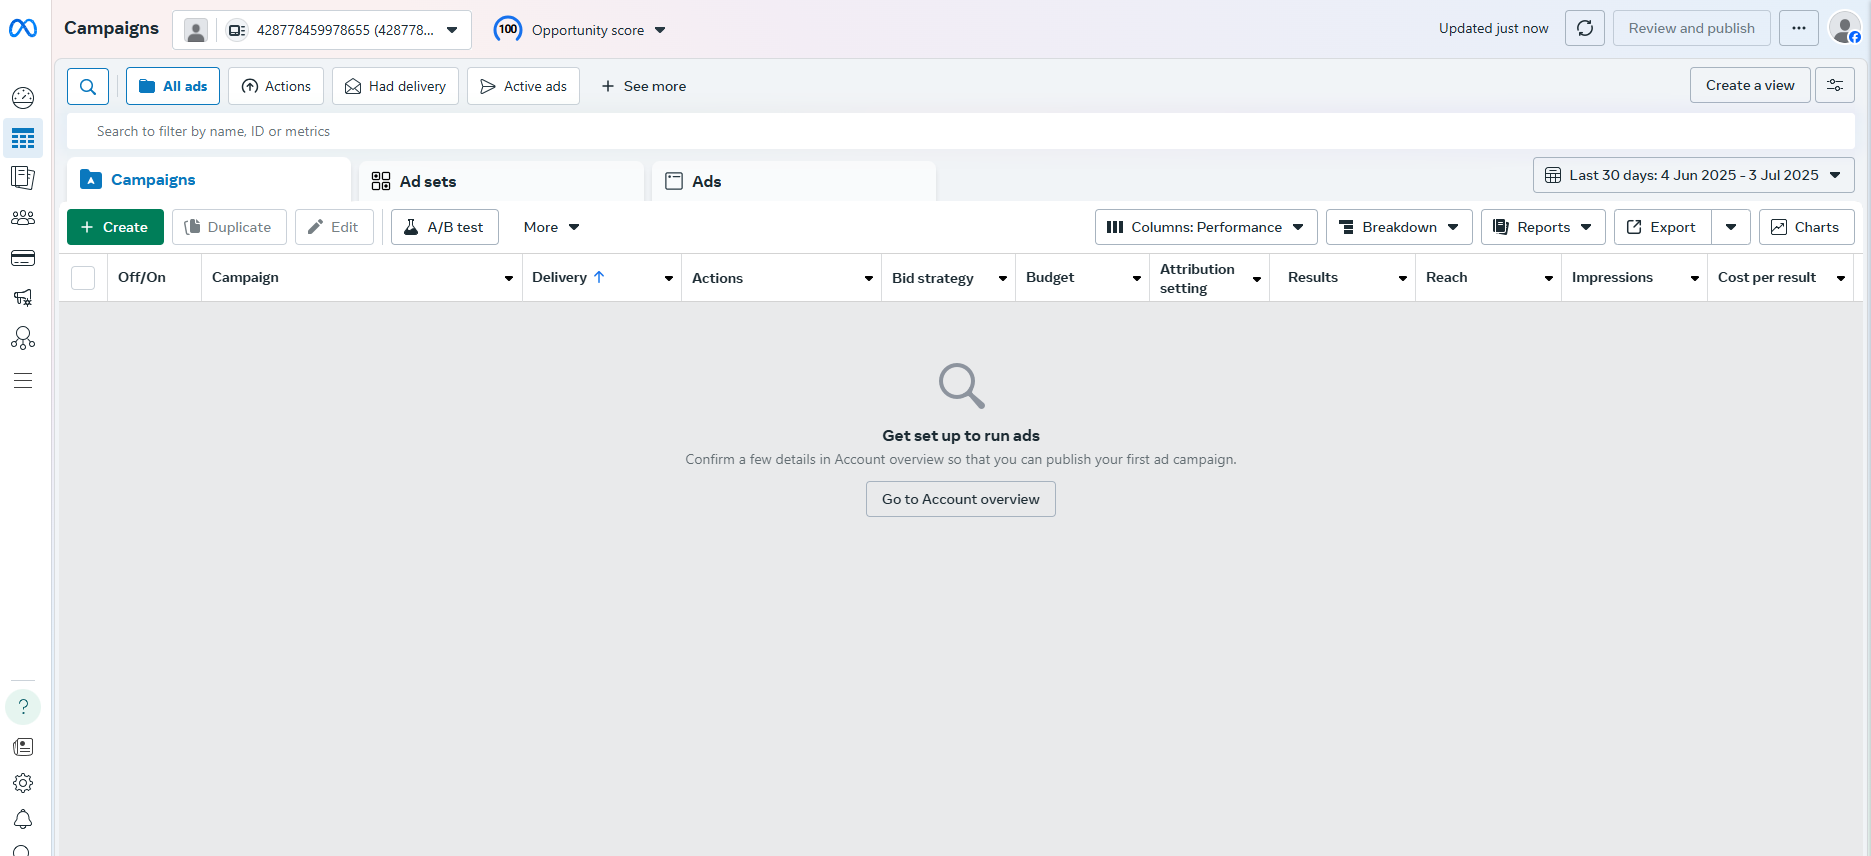
The interface will look empty when you first log in. Once you create your first campaign, it will show up here, and you can go ahead and make edits, publish, or view performance.
We’ve told you what it does and how to access it; now, let’s look at how you can set up your first ad on Meta Ads Manager.
Creating your first campaign on Facebook Ads Manager
Look for the bold green “Create” button on the left side of your screen. That’s your starting point.
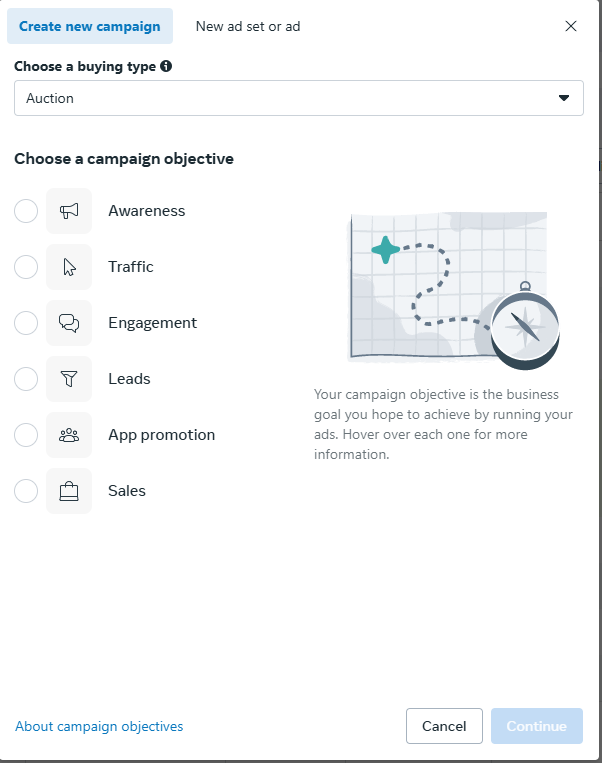
It will open a setup tray where you’ll choose two important things:
- Your campaign objective: what you want your ad to achieve
- Your buying type: how you want to pay for your ads
Choose your buying type
You’ll see two options here: Auction or Reservation.
This is what they mean:
| Buying type | What it means | Best for |
|---|---|---|
| Auction | Your ad enters a real-time auction and competes with other ads for visibility. Meta automatically tries to get you the best results for your budget. | Sales, leads, traffic, and general performance-focused campaigns |
| Reservation | You book ad space in advance and pay a fixed price to reach a certain number of people. | Big-budget brand awareness campaigns that need guaranteed delivery |
If you’re just starting out or running performance campaigns, stick with Auction.
Choose your campaign objective
Now it’s time to tell Meta what you want your ad to achieve. Generally, you can only choose from these options.
- Awareness: Good for reach and brand recognition
- Traffic: Send people to your website, app, or landing page
- Engagement: Get more messages, video views, likes, or event responses
- Leads: Collect contact details through forms or messaging
- App promotion: Get more installs or usage of your mobile app
- Sales: Show your product to people likely to buy (best for eCommerce)
When running a catalog or trying to increase sales, choose Sales as your objective. You’ll be able to optimize for purchases, show product sets, and target people likely to convert.
Set up your campaign details
The campaign is the foundation of your ad.
It’s more of a big container that holds everything else, including your targeting, ad creatives, budget, and goals. Whatever decision you make here sets the tone for the rest of the ad flow.
When you choose your campaign settings, you're telling Meta,
‘Here’s what I want to achieve. Help me find the people most likely to make it happen.’
Let’s walk through what you’ll need to set up:
- Campaign Name: Name it something clear. For example, you can include the month, the product name/set, and the type of audience you're targeting. A name like ‘July Sales – T-shirt Promo – Website Visitors’ is better than just ‘Test Campaign.’ You’ll thank yourself later when you’re managing several campaigns at once.
- Buying Type: Leave this as Auction. You’ll get more flexibility, and Meta will try to get you the most results for your money.
- Advantage Campaign Budget (CBO)- You’ll see the option to turn this on or off. Leave it off if you're just starting out or want to test different ad sets with fixed budgets. Turn it on if you want Meta to manage your budget across multiple ad sets and prioritize what’s working best. We’ll explain more in the budget section of this guide.
Define your ad set: Budget, audience, placements
This next step, the ad set, is where you decide the who, where, and how much.
You’ll tell Meta who should see your ad, where you want it to show up (like Instagram Stories or Facebook Feed), and how much you’re willing to spend to get results.
Each campaign can have one or more ad sets, and each ad set can target different audiences, use different placements, or have its own budget.
However, for the sake of simplicity, we’ll just use one ad set for our campaign example.
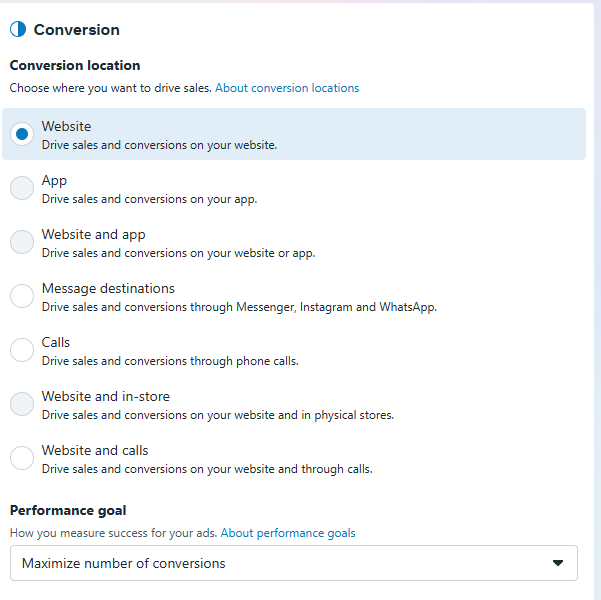
Set up the conversion location
Since we’re working with eCommerce, choose Website or Website + App if you want to track activity from both.
This tells Meta where you want the action (purchase, sign-up, etc.) to happen. For most online stores, the website is the go-to.
For the performance goal, keep it as is since Facebook will show your ads to people most likely to take action.
Pixel setup
Before you go any further, make sure your Meta Pixel is connected.
Why is the pixel so important?
It tracks people's actions on your website/ecommerce store and helps you understand how impactful your ad is.
It’s also quite handy for setting up campaigns in the future. For example, suppose some users added items to their cart from your Shopify store but didn’t check out. In that case, you can set up a Shopify-Facebook retargeting ad using the pixel data to capture and nudge them to complete checkout.
If you’re not seeing “Pixel” anywhere when setting up ads, don’t panic. Meta recently rolled pixel tracking into something called a Dataset, which includes Pixel and other event data in one place.
If you have created a pixel before, you don’t need to change anything.
“We’re gradually introducing changes to how your event data is shown in Meta Events Manager. Website, app, offline, and messaging events will be merged together into a single view. This is called a dataset. If you create a dataset from an existing pixel ID or if your pixel has been automatically converted to a dataset, your new dataset ID is the same as your pixel ID.”- Meta
How to set up Meta Pixel in 8 simple steps
- Go to Events Manager at Meta Events Manager.
- Click “Connect Data” and select Web.
- Create your Pixel by giving it a name and clicking Create.
- Enter your website URL to check for partner setup options (like Shopify or WordPress).
- Follow the steps to install your Pixel using a partner integration, or choose manual setup if no partner is available.
- Add the Pixel base code to your site’s header (or send the code to your developer).
- Set up events (like purchases or add-to-cart) using the event setup tool or by adding code.
Set up the Conversions API for better tracking alongside your Pixel. According to Meta, Advertisers who use Conversions API alongside the Meta Pixel for web events saw a 13% decrease in cost per result, on average.
For a more detailed step-by-step, check out this guide by Meta.
Choose the conversion event
In our case, selecting the Purchase would be better because it tells Meta to optimize your ad for people likely to buy.
When you select your conversion event, Meta tracks it in one of two ways:
1. Standard events
These are predefined by Meta and automatically triggered when you install a Pixel on your website. They include common actions such as page views, leads, add to cart, initiate checkout, and purchases.
If you're running an online store, standard events cover most of your needs.
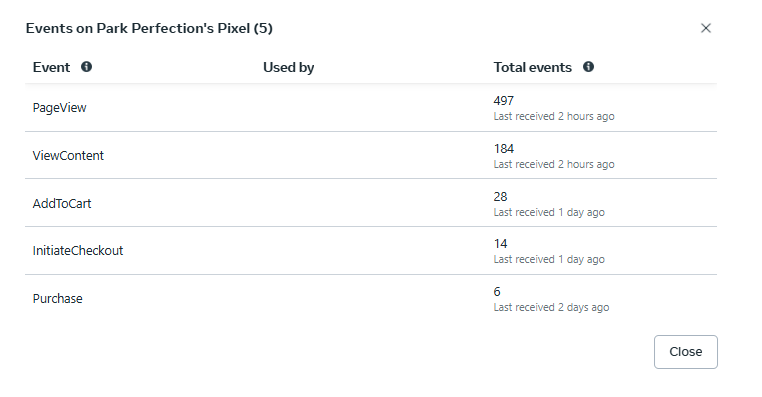
2. Custom events
These are events you create yourself, using your own names, when a Standard Event doesn’t match what you want to track.
They’re really specific, as you can see from the examples below:
- SubscribedToNewsletter
- ClickedWhatsAppButton
- WatchedVideo50Percent
Use them when you need detailed insights into unique user actions.
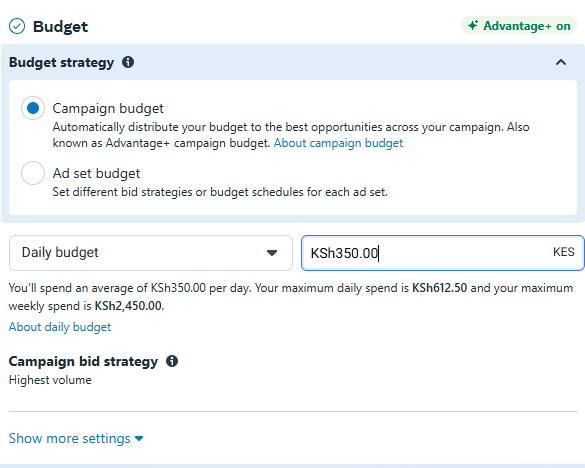
Setting the budget and defining the ad schedule
This section is where you tell Meta how much you’re willing to spend and over what period. The options you see here depend on whether you turned on the Advantage campaign budget earlier.
If you chose campaign-level budgeting, you’ll set your budget at the campaign level. Meta will then decide how to split it between your ad sets based on what’s performing best.
If you left it off, you’ll see budget controls here at the ad set level.
You can choose between:
- Daily budget- the average amount you want to spend per day
- Or lifetime budget- the total you’re willing to spend over the entire campaign duration
You’ll also be able to set:
- A start date (and time)
- An end date if you want the campaign to stop automatically
- An optional schedule, in case you want your ads to run only on specific days or hours
When you choose the Advantage+ campaign budget, you’ll see this at the campaign level:
…And these controls at the ad set level:
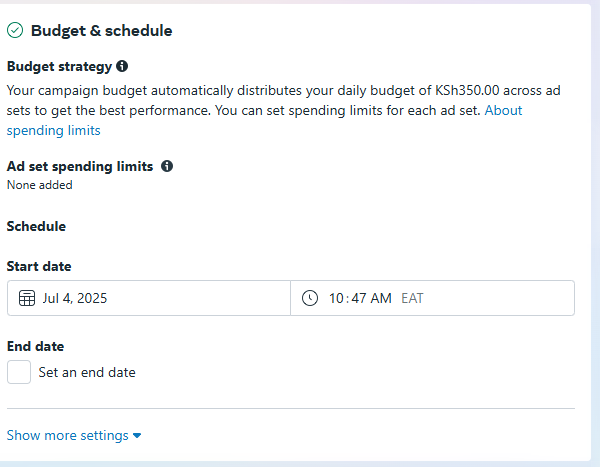
However, if you set an ad set budget, you’ll see this at the ad set level:
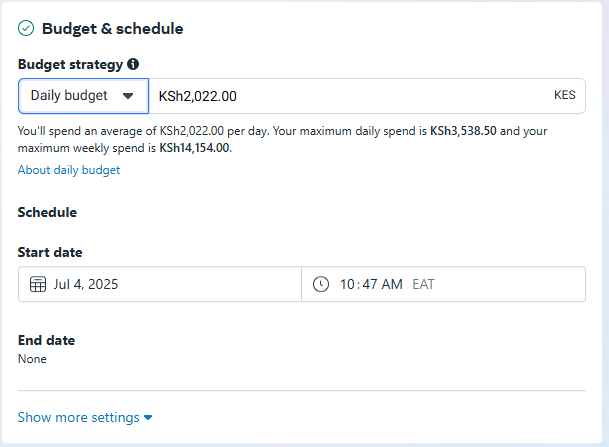
As you can see, with an ad set budget, you’ll be able to define the exact amount to use for each ad set.
So which should you use?
Unless you need to control budget by region or audience, Advantage Campaign Budget is the smarter choice because it lets Meta automatically shift spend to where the best results are coming from in real-time.

Facebook Ads Expert at Social Bamboo
Either way, start with a smaller budget to help you learn how your campaign will perform, then increase as you become more confident about your audience targeting and ad creatives.
Audience targeting
Audience targeting is one of the most important parts of your ad setup.
The controls here tell Meta exactly who you want your ads to reach and who to leave out. When you get this right, you’ll see better engagement, more clicks, and higher conversions.
However, if you get it wrong, you could end up spending your budget on people who were never going to buy in the first place.
If you’re just starting out, building a broad interest-based audience is the safest option.
How?
Think about your ideal customer.
What are they into? What do they care about? What brands do they follow? If you can answer these questions, then you’ll have reliable interests you can use to guide your targeting.
Below are some other settings Meta Ads Manager lets you configure:
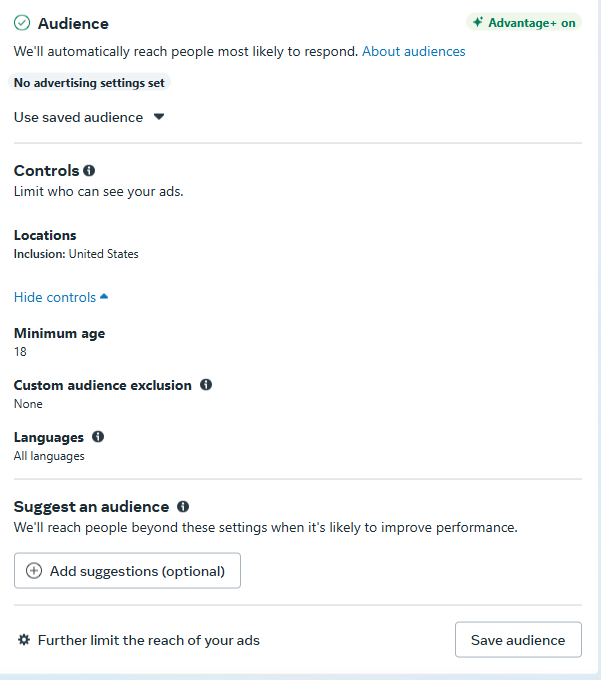
- Location: Start with the countries where you ship or serve. You can also go more specific by targeting cities or regions.
- Age and gender: Narrow these only if your product is age- or gender-dependent. For example, if you sell summer dresses, it makes sense to focus on women aged 18–50.
- Detailed targeting: This is where you choose interests, behaviors, or demographic traits.
Avoid going too narrow when setting up your audience targeting. Meta's algorithm works better when it has more data to learn from. The broader your audience (within reason), the better it can optimize over time.
If you've been posting regularly on Facebook or Instagram, your Facebook Audience Profile Insights can also give you a good idea of who’s already engaging with your content.
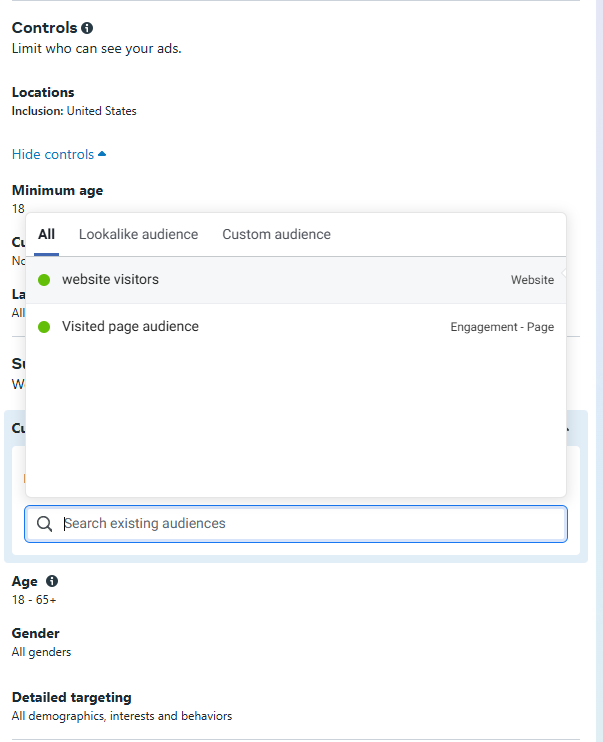
That said, if you already have data, say a customer list, past purchasers, or website visitors, you can upload that and create a custom audience. You can even go a step further and create a lookalike audience so Meta can find new people similar to your best existing customers.
What if you’re new to the market and are still figuring out your target audience?
We recommend using Facebook ads spy platforms or Facebook Ads Library to find out what competitors are doing and give you ideas based on who they’re reaching and what messaging they use.
Placements
Choose Manual Placements if you want to control where your ad appears.
By default, Meta recommends Advantage+ placements (previously called automatic placements). With this option, Meta will show your ad across all available spaces and use its algorithm to determine which placement delivers the best results for your goal.
It's best to leave this option on unless you have a strong reason to control where your ad appears.
Manual placements are useful if:
- You’re designing creatives specifically for a format (like vertical video for Stories)
- You’ve seen past campaigns perform better on specific platforms
- You’re testing one placement at a time to learn what works best
For most campaigns, though, Advantage+ placements will give Meta the room to optimize for results.
Once placements are set, you’ll see a rough estimate of your expected reach and performance. That’s your cue to click Next and move on to the ad itself.
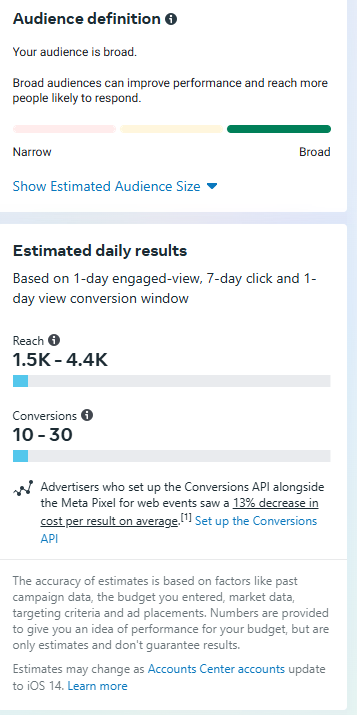
These numbers are estimates and will fluctuate once you start running the ad.
Click Next to start setting up the ad creatives.
Create your ad
This section determines what your ads will look like when they land on your target audience’s screen. Every decision you make here determines how people experience your brand.
First, choose which Facebook, Instagram, and Thread page you want to run your ads on.
Be careful here. If you manage multiple brands or pages, double-check that you’ve picked the right one. This is the name and profile people will see in the ad.
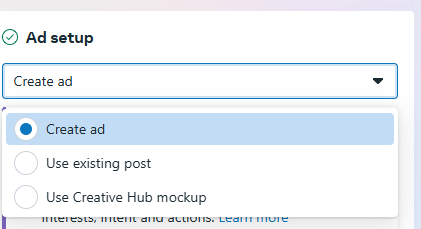
Decide what kind of ad you're creating
You have two options:
- Create a new ad from scratch
- Use an existing post from your page
If you're running Facebook catalog ads, you can also pull product images directly from your catalog feed. It’s a super helpful option when you want to promote multiple items dynamically without creating individual ads for each product.
Choose your format
Meta gives you #3 main layout options:
- Single image or video: Great if you want to focus on a single product or offer.
- Carousel ad: Best for showing off several products, product features, or steps in a process.
- Collection: This format lets users browse a range of products within the ad.
For eCommerce, collection and carousel ads work well because they let you highlight different angles of your product or multiple items from a collection.
Add your creatives
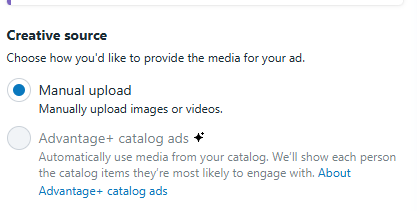
If you chose Advantage+ catalog ads, Meta will display product sets from your catalog here, and you can choose which ones to promote.
The ad automatically pulls in the product name, price, and image. It’s easy, fast, and the perfect choice if you’re running dynamic campaigns with a lot of inventory.
But if you didn’t go with a catalog setup or want more control over how your products show up, you’ll need to manually upload your images or videos.
Either way, the most important thing here is making sure that your images are relevant and attention-grabbing.
But what happens with most eCommerce stores?
They use plain, boring backgrounds with no enriched annotations, such as reviews, discount price displays, product callouts, etc.
If you want to create catalog ads that feel more branded and click-worthy, consider using a catalog ad builder to enrich your product visuals.
Cropink, for example, can pull product info directly from your feed and help you layer in key elements like discounts, product callouts, and social proof in just a few clicks.
Instead of a plain white background that looks like every other product in the feed, your catalog ads now become branded, engaging, and built to convert. Much like the examples below:
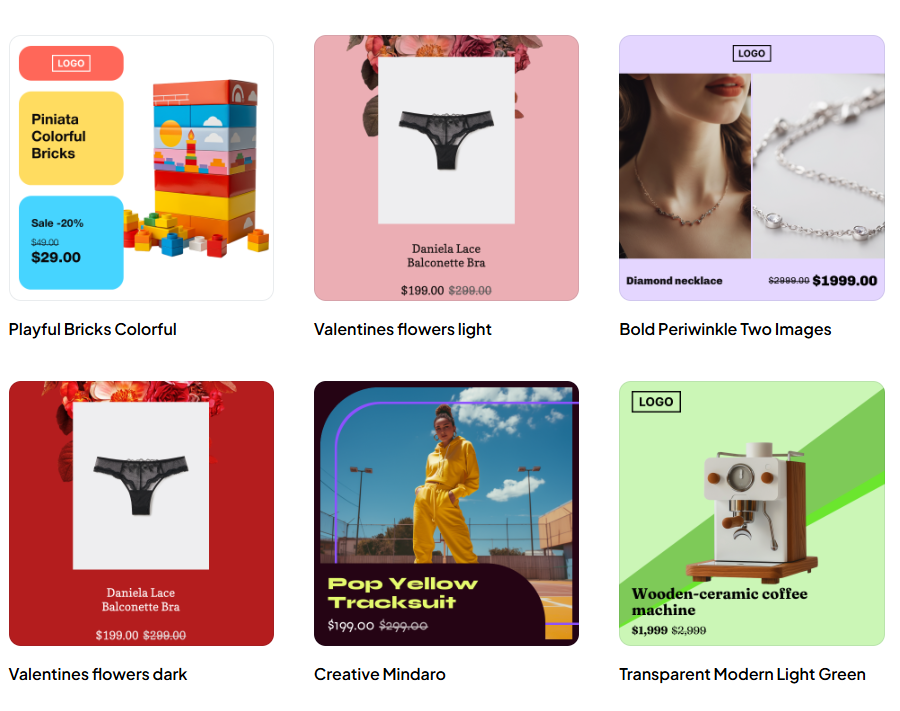
Find more templates like these here.
Create your primary text
You don’t need to be a copywriter to make this work. Just keep it focused and relevant to the product you're promoting.
Here’s a simple structure to use for your first caption:
- Call out the problem or make them pause
- Explain why your product is worth clicking on
- Give them a reason to act now, like a limited-time discount
- CTA: Tell them what to do next. Check out these popular CTA examples for inspiration.
If you're running a catalog ad, remember that the image and product details are already doing part of the work.
Your caption should add context or urgency, not just repeat what’s in the image. This guide has some pretty good Ad text examples for your caption.
Add your headline and description
Your headline sits right under your creative. It’s one of the first things people see as they scan the ad, so keep it short, punchy, and product-focused.
It’s more like your second hook and should highlight an offer, value prop, or key selling point.
Examples:
- Buy One, Get One Free
- Free Delivery on All Orders
- Glow in 7 Days
The description is optional and often doesn’t show on mobile.
Set your call to action
The CTA button tells people what to do next. You can ask your audience to Shop Now, Learn More, Sign Up, Send Message, and so on.
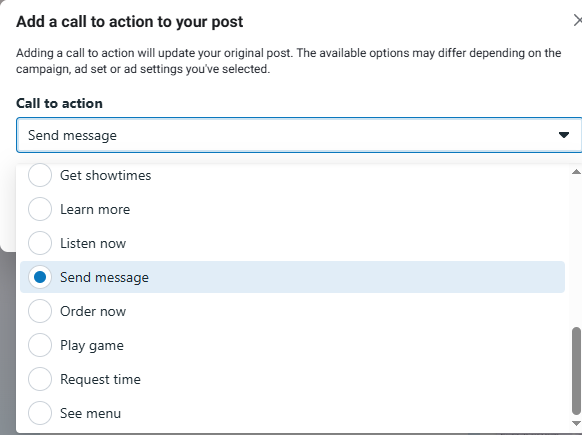
If you’re selling something, use Shop Now.
Don’t use vague CTAs like ‘Learn More’ unless you're genuinely sending people to a long-form product explainer or info page.
The more direct the CTA, the less friction there is for your customer.
Paste your destination URL
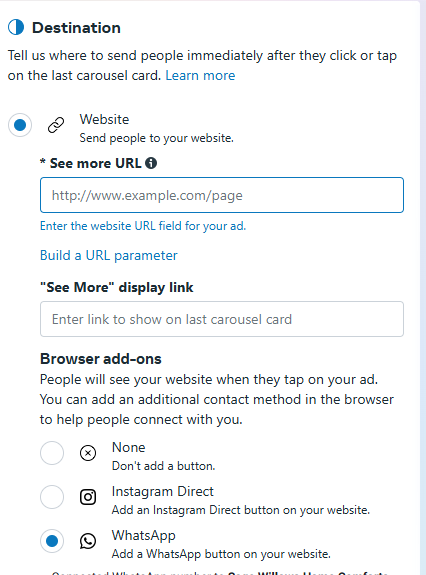
In this case, the URL should be the page people land on when they click your ad.
When the ad promotes a specific product, link directly to that product page. However, if you're advertising a category or sale, provide a link to the relevant collection or landing page.
You can also add a contact method like WhatsApp or Messenger, but only if it fits your sales process.
If your goal is purchases, too many choices (chat vs. buy) can split attention and reduce conversions.
Review and Publish Your Campaign
You’ve set up your campaign, defined your audience, added your creatives, and written your copy, but before you hit publish, take a few minutes to review everything.
- Are you using the correct Facebook Page and Instagram account?
- Is your objective set to match your campaign goal?
- Have you selected the right Pixel and conversion event?
- Is your budget realistic for your audience size and goal?
- Does your creative look sharp across placements?
- Is the headline clear and tied to the offer?
- Does your link go exactly where it should?
- Is your CTA strong and consistent with the rest of the ad?
If it’s a yes to those quality assurance questions, click Publish.
Your ad will enter the review period. Meta usually approves ads within 1–24 hours, but this can vary per account.
What if you need to edit your ads?
We recommend waiting at least 24 hours before changing newly published ads.
If you need to edit an ad, go to https://adsmanager.facebook.com/adsmanager, hover over the campaign you want to edit, and click the Edit button.
You can then make changes at the campaign, ad set, or ad level. Remember to hit Publish so the changes go live; otherwise, your edits, not the campaign, will remain a draft.
Keep in mind that once you edit and publish, the ad goes back into review, although in most cases, this second review is faster than the initial one.
However, note that you can’t edit some sections after publishing your ad:
- You can’t change the campaign objective
- You can’t switch between Auction and Reach and Frequency (Reservation)
If you need to change either of those, you’ll have to duplicate the campaign and start fresh.
Viewing ad results with Meta Ads Manager
When your ads are live, you’ll want to track how they’re doing. Fortunately, you can get all performance data right from Meta Ads Manager.
Check key performance metrics
When you land on Meta Ads Manager, you’ll see the following metrics:
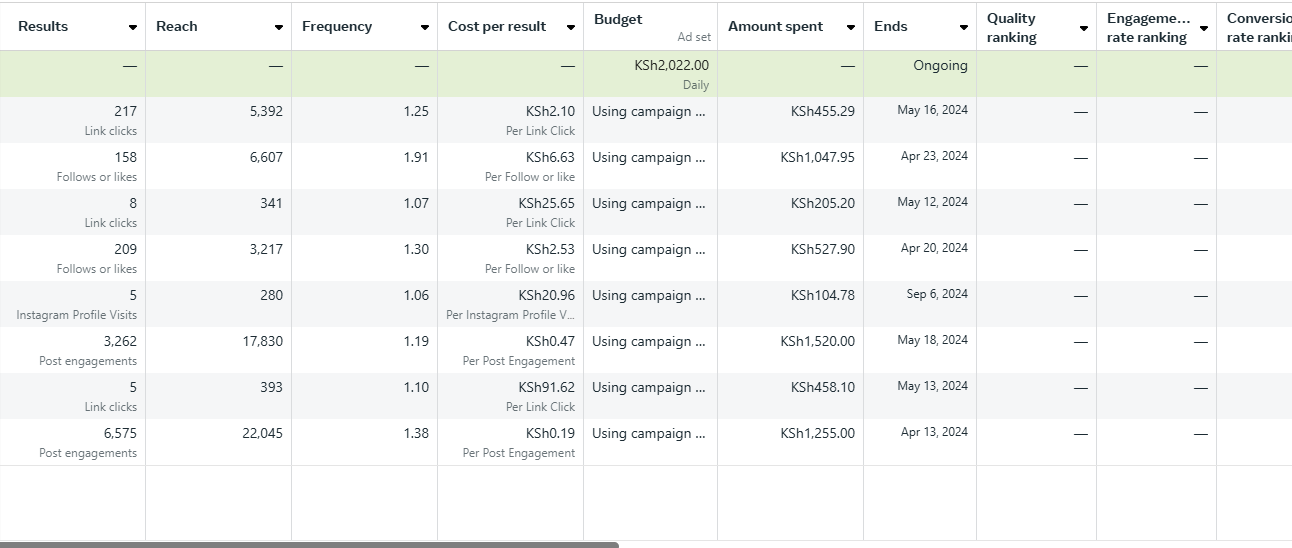
- Results – Number of actions based on your campaign goal (e.g., purchases, link clicks)
- Cost per result – How much you're paying for each action
- Amount spent – Total budget used so far
- Click-through rate(CTR) – Are people clicking your ad?
- Return on ad spend(ROAS) – Only visible if you’ve set up purchase tracking
You can customize these columns by clicking Columns > Customize Columns to analyze the metrics that make more sense for your campaign.
Use breakdowns for more in-depth insights
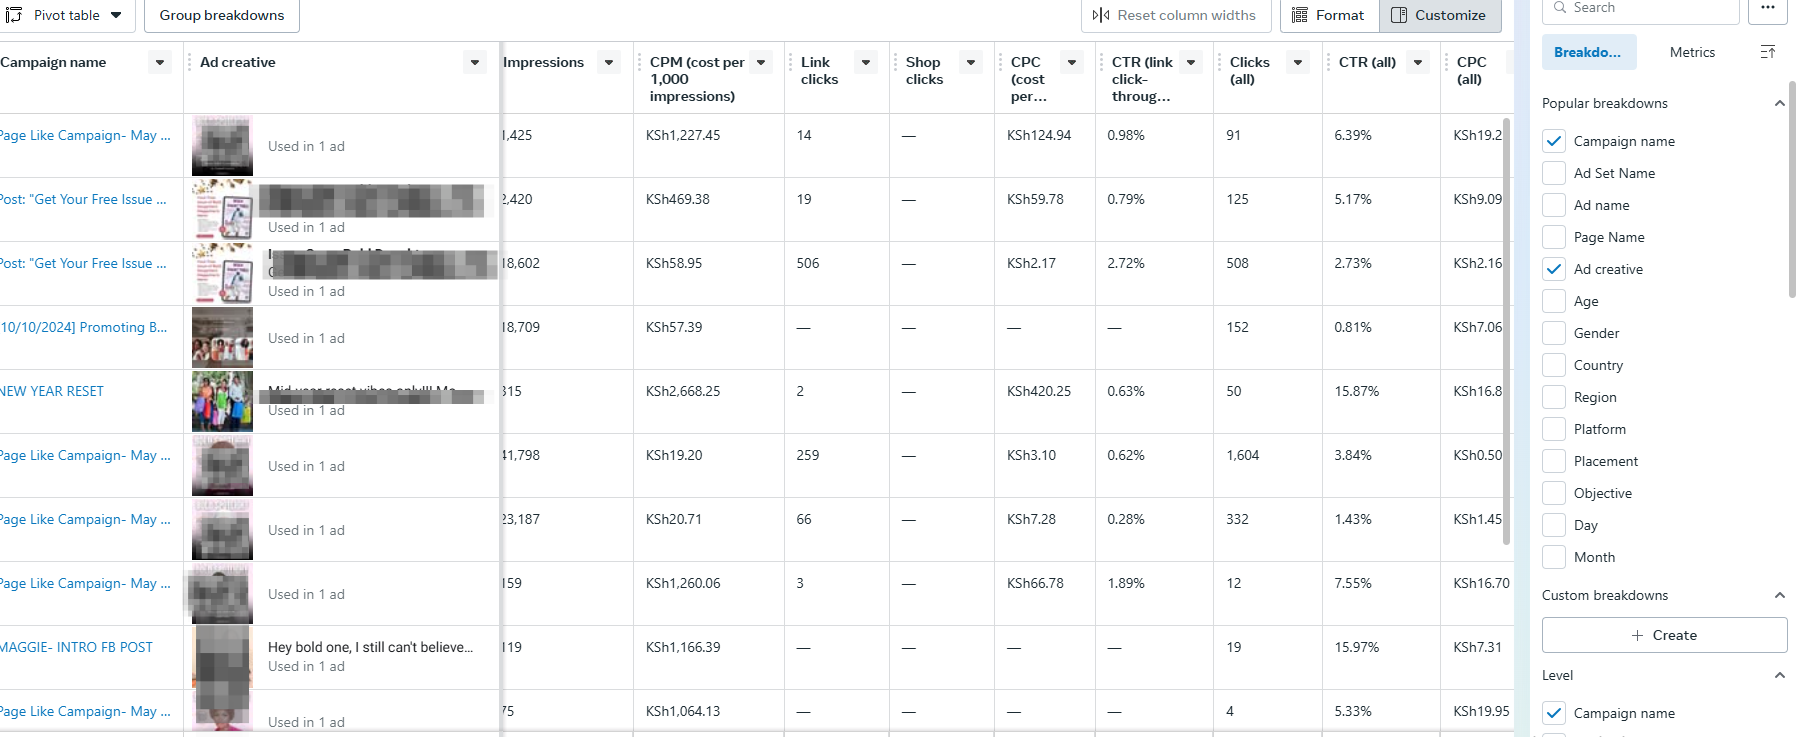
Click on Breakdown (top right) to sort your results by things like:
- Age or gender
- Platform (Facebook vs Instagram)
- Placement (Feed, Stories, Reels)
- Location (country or city)
This will give you a better idea about who’s clicking, buying, or ignoring your ad, so you can adjust your targeting or creative if needed.
Final thoughts
Meta Ads Manager is one of the most useful tools an eCommerce brand can use to get better results with Facebook advertising. It’s free, it’s powerful, and once you learn how to use it, you’ll never want to rely on the Boost button again.
That said, the learning curve can be pretty frustrating. However, if you bookmark this guide, you’ll have everything you need to set up and launch high-performing campaigns in just a few minutes.
Before you go, one last reminder: your ad setup matters, but your creatives matter, too.
You could target the right audience and set the perfect budget, but your results will be underwhelming if your images are bland or your messaging is unclear.
We recommend using a catalog ad platform like Cropink to transform basic product images into brand-consistent ads that give you better ROAS and conversion rates.
If you’re ready to launch better-looking catalog ads faster, try Cropink.
It’s the easiest way to create branded, high-converting Facebook catalog images in minutes. You don’t even need design skills to get started. You can try it out for free without a credit card.
FAQs
Meta Ads Manager is the platform you use to run ads across Facebook, Instagram, Messenger, and the rest of Meta’s network. It lets you create campaigns, choose who sees your ads, set your budget, and track performance.
It's used to set up and manage all aspects of your Meta ads. You can create different types of campaigns, test variations of your ads, choose your audience, monitor performance, and make edits as needed. It gives you way more control than just boosting posts.
Meta Ads Manager is free to use. There are no subscription fees or platform costs to access the tool itself.
You’ll need a personal Facebook account to access the tool and a Facebook Business Page to run ads. If you want your ads to appear on Instagram, you’ll also need to connect your Instagram account.
Meta Ads Manager is for running ads on Facebook, Instagram, and other Meta-owned platforms. Google Ads Manager is used to run ads on Google Search, YouTube, Gmail, and across Google’s Display Network. They’re both ad tools but reach people in different places and serve different marketing goals. Many businesses use both.
Sources
- Cropink. Business on Facebook Statistics
- Facebook. About Meta Pixel
- Facebook. Maximise your campaign performance with the Meta Conversions API.
- Facebook. Set up and install the Meta Pixel
- Derek Videll. Should You Use Advantage Campaign Budget for Running Facebook Ads?
Damaris is a Digital Marketing Specialist who writes about digital marketing and performance marketing. At Cropink, she creates data-driven content to help businesses run better ad campaigns for better performance and ROI.
Leszek is the Digital Growth Manager at Feedink & Cropink, specializing in organic growth for eCommerce and SaaS companies. His background includes roles at Poland's largest accommodation portal and FT1000 companies, with his work featured in Forbes, Inc., Business Insider, Fast Company, Entrepreneur, BBC, and TechRepublic.
Related Articles


How Can Cropink Help?
Start with Cropink is easy and free
No credit card required