How to Set Up a Facebook Shop Like a Pro [+ Tips from Experts]
Facebook Shops allow customers to browse and buy directly from social feeds. With 64 million people shopping on the platform, this guide breaks down setup steps, approval requirements, catalog optimization, and expert tactics that help shoppers trust your store.


![How to Set Up a Facebook Shop Like a Pro [+ Tips from Experts]](https://honest-garden-2954e8e7e9.media.strapiapp.com/how_to_set_up_a_facebook_shop_thumbnail_204d2dbbb5.png)
When compiling data about Facebook, we found that 64 million people are expected to shop directly from the platform by the end of this year. That makes it one of the most valuable social commerce platforms for businesses selling online.
One of the smartest ways to tap into that audience is by setting up a Facebook Shop.
Today, we’re going over the entire process of creating a Facebook Shop and even how to connect it to your Instagram so you don’t leave any buyers out.
What are Facebook Shops?
A Facebook Shop is an online storefront that lets you display and sell products on Facebook and Instagram.
Customers can browse, add items to their cart, and then complete their purchase through your website’s checkout page.
On your side, you can use Commerce Manager to track shop sales performance, see which products are most popular, and get insights that can help you improve your catalog.
With a Facebook Shop, your products can appear in Facebook Shop, Instagram Shop, and even Marketplace.
What you need before creating a Facebook Shop
To set up your shop, make sure you have:
- A personal Facebook account
- A Facebook business page with admin access
- An Instagram business account (if you want to connect the shop to Instagram)
- A product catalog with items available for direct purchase from your website
- A business located in an eligible country
Which countries are eligible to operate a Facebook Shop?
| Region | Eligible countries |
|---|---|
| North America | Canada, United States (excluding US Territories: American Samoa, Northern Mariana Islands, Guam, Puerto Rico, US Virgin Islands) |
| Latin America | Brazil*, Mexico |
| Europe | Denmark*, France*, Germany*, Italy*, Netherlands*, Norway*, Spain*, Sweden*, Switzerland*, Ukraine*, United Kingdom |
| Asia-Pacific | Australia, India*, Indonesia*, Japan, Korea, Taiwan, Thailand* |
Note that the countries marked with an asterisk(*) have limited Shop features.
Facebook also expects your business to have demonstrated a sufficient, trustworthy, and authentic established presence. They might, therefore, request documents to verify your business identity.
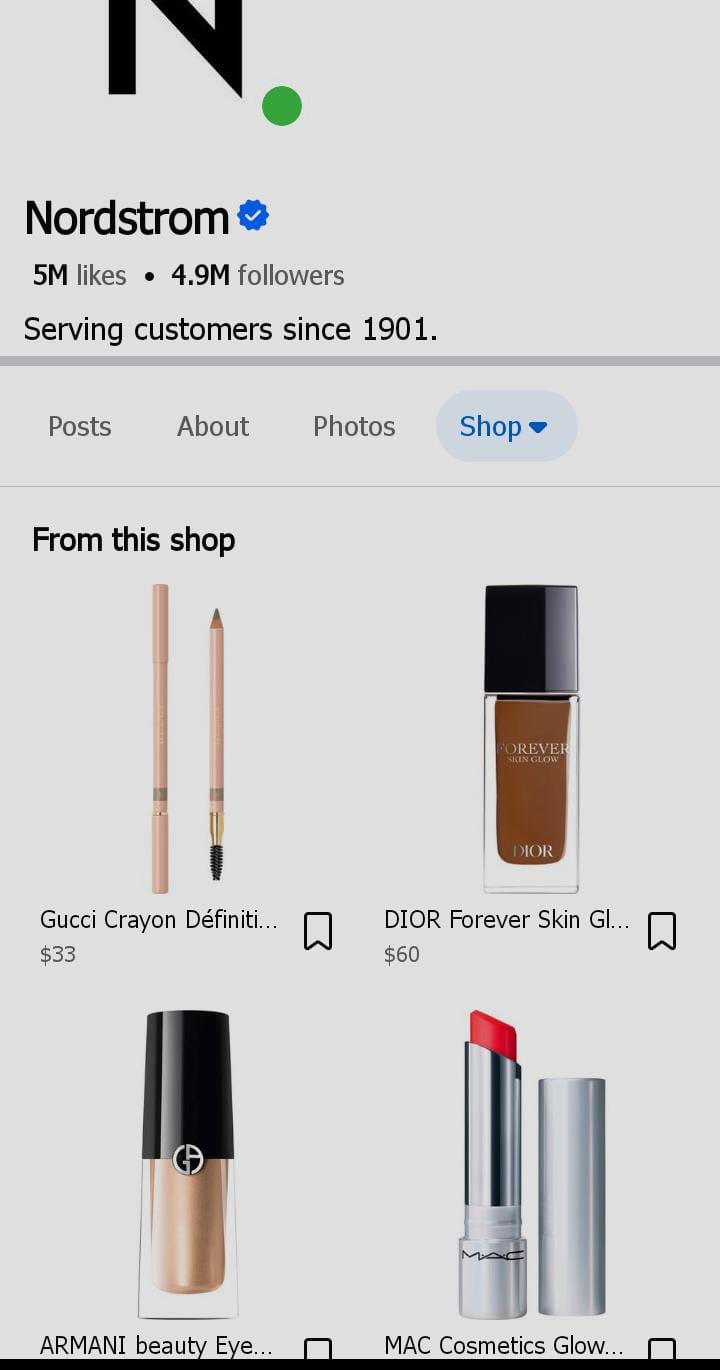
NOTE: As of December 21, 2023, Facebook no longer offers web-based Shop features in any region.
The Shop tab can be accessed in the Facebook mobile app under the ‘More’ section. Here’s what it looks like when displayed.
How to set up a Facebook Shop
Setting up your shop happens directly in Facebook Commerce Manager. Read on for a walk-through of how to access it.
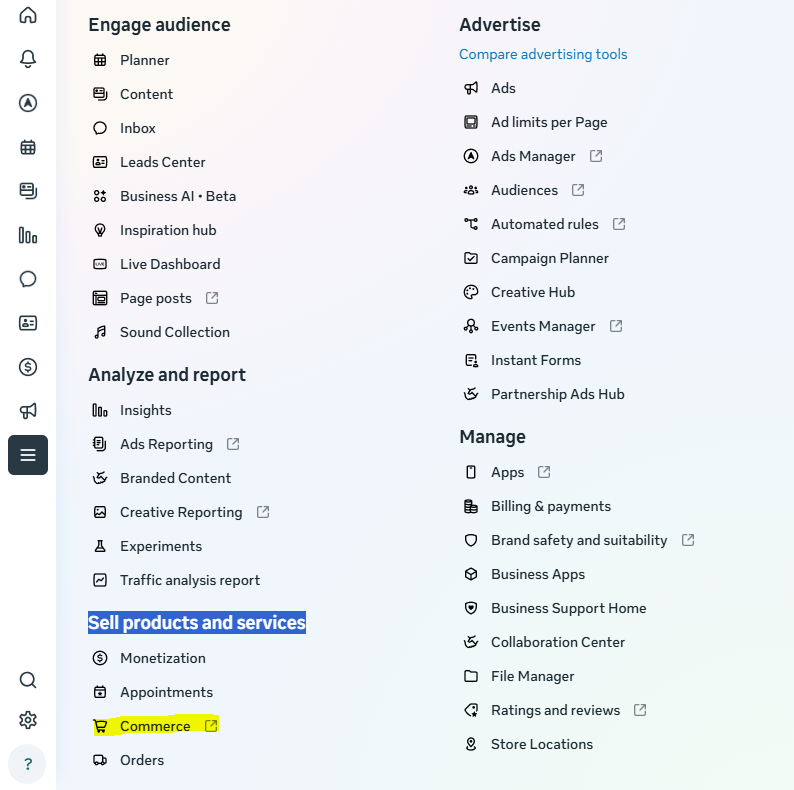
Step 1. Open Commerce Manager
In Meta Business Manager, select All tools and then, under Sell products and services, choose Commerce to open Commerce Manager.
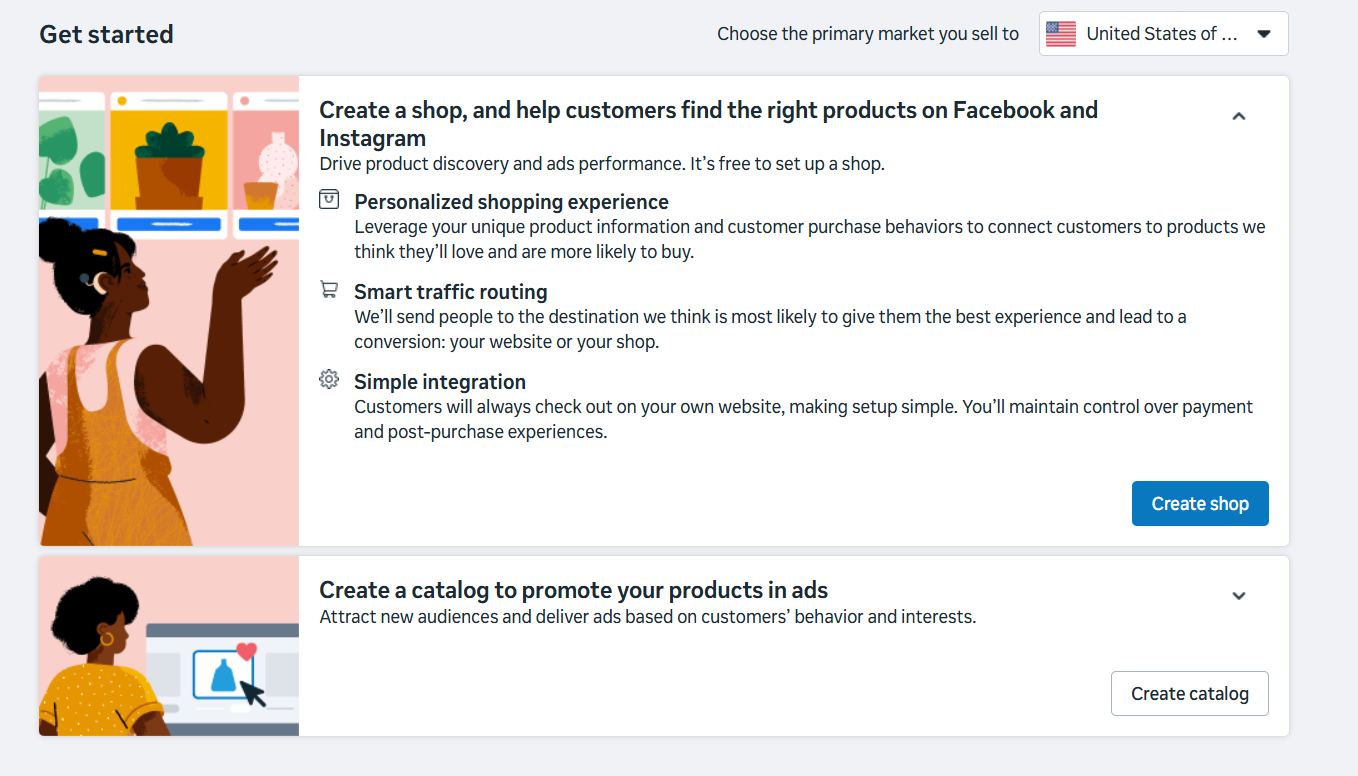
If you’ve never set up a catalog or shop before, Facebook will prompt you to add products and create your first Shop.
Step 2. Create your commerce account and choose your setup path
Follow the on-screen prompts. When asked about a platform, pick your eCommerce partner, like Shopify or Magento, if you use one. If you do not use a partner, continue with the manual setup.
Your screen will look more or less the same as this:
Step 3. Select the assets you will sell from
Next, select the pages you’d like to sell from under the Sales Channel. Choose the Facebook Page that will host your shop. You can create a new Page during setup if you need to.
Remember to also connect your Instagram business account if you plan to sell on Instagram.
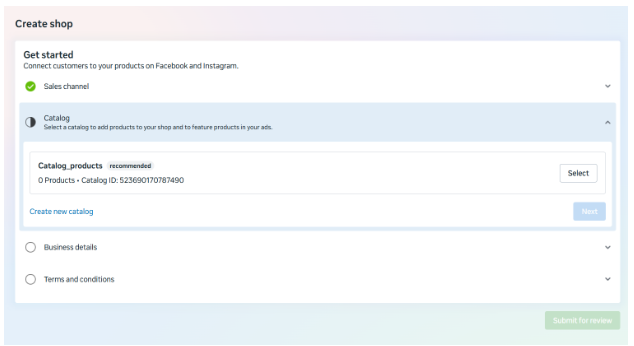
Step 4. Create or select your product catalog
It’s now time to create or choose a product catalog. If you already have a catalog set up, you can link it. If not, the Commerce Manager will prompt you to create one.
A catalog is your product list, and you can fill it in by connecting a product feed from your eCommerce system or manually adding items if you only have a small number.
Step 5. Enter business details and submit for review
Next, Facebook will ask for your business details. Primarily, they’re interested in your contact email, your return window, the link to your return policy, and a privacy policy link if you collect emails.
Once you provide this information, agree to the terms and conditions, and submit the application, Facebook will review your shop.
In some cases, they may request documents to verify your business identity. The review can take up to four weeks.
Before your shop can go live, you still need to complete a few other settings, as explained below.
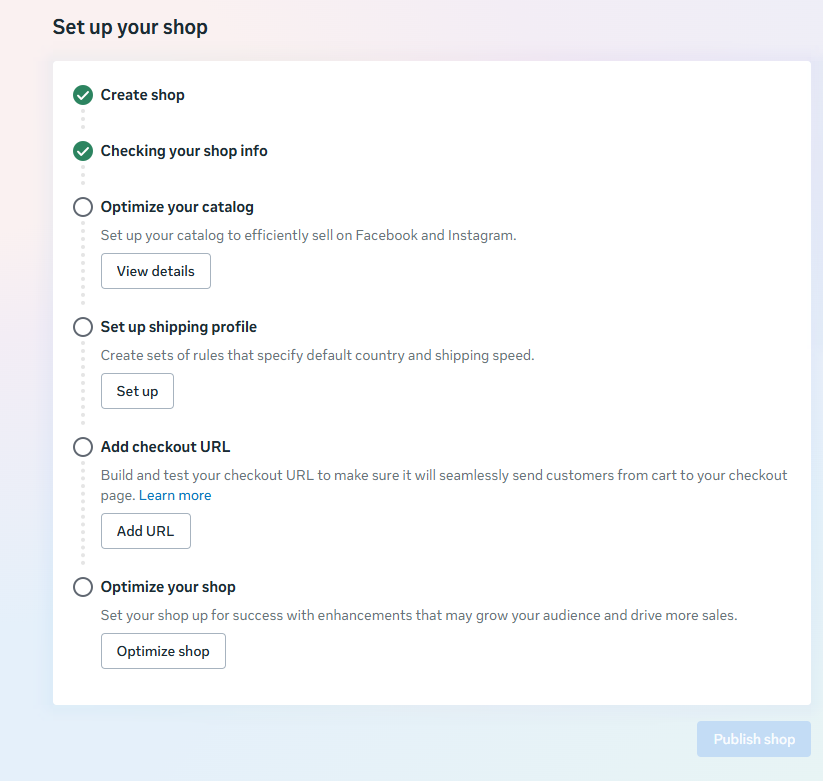
Let's go through each section step by step.
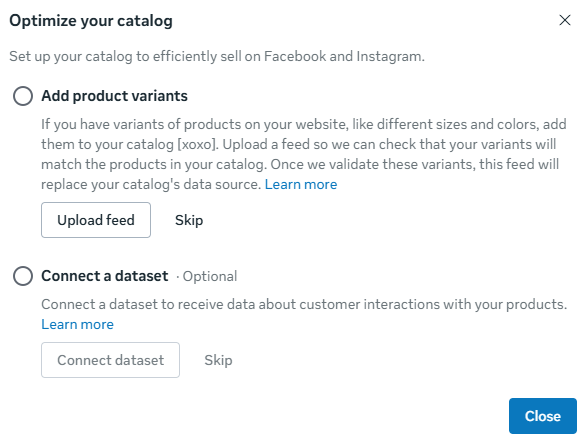
Step 6: Optimize your catalog
If you remember, we just named our catalog in the previous step, but did not add any products yet. This is the step where you do that. Make sure each listing includes a title, price, product image, availability, and a direct link to the product on your website.
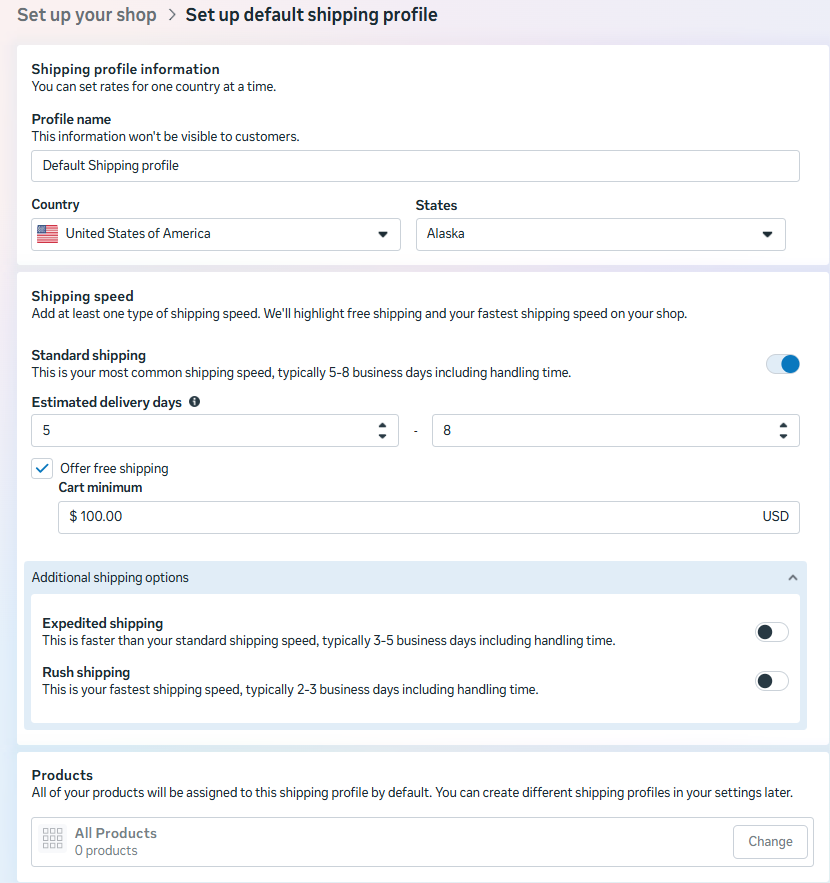
Step 7. Set up default shipping profile
Next, set up your shipping profile. Rates must be added one country at a time, and you’ll need to offer at least one type of shipping speed.
Facebook allows #3 shipping options,
- Standard shipping, which takes five to eight business days
- Expedited shipping, which takes three to five business days
- And rush shipping, which takes about two to three business days.
Step 8. Add checkout URL
The last step is to now add a checkout URL. Facebook sends buyers to that URL once they add products to their cart.
Since Facebook no longer supports native checkout, purchases must be completed on your website or a third-party platform of your choice.
The URL you add should include parameters for product ID, quantity, and coupon codes, so that the customer’s order details carry over correctly.
As with your products, make sure to also test this URL to confirm that it can handle products and send customers to the correct cart or checkout page.
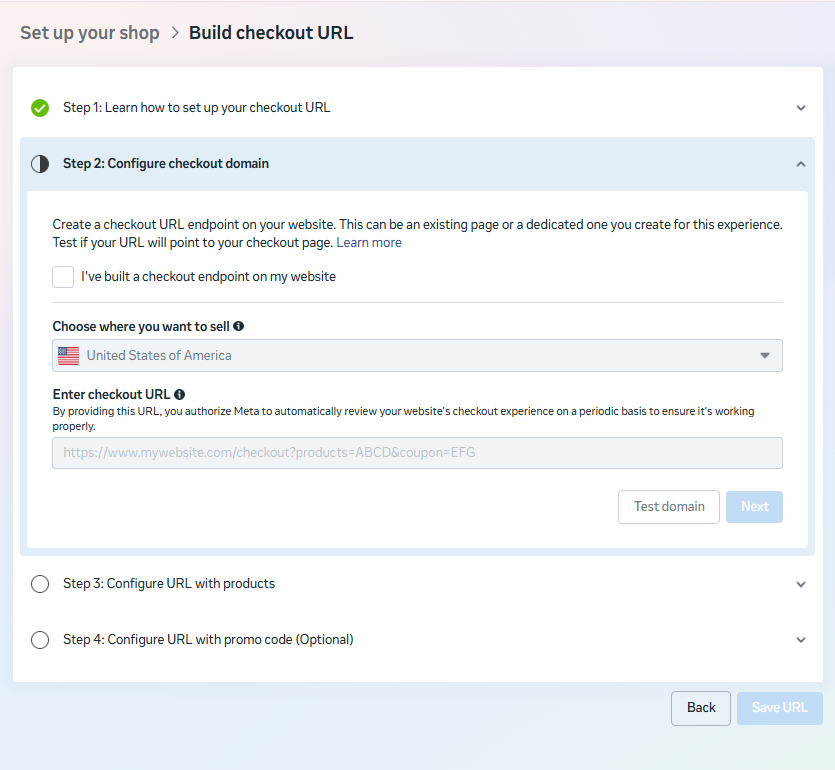
When creating your checkout URL, follow these best practices recommended by Meta.
- Allow guest checkout so buyers can complete their purchase without creating an account or logging in.
- Clearly show products, quantities, subtotal, and total cost.
- Support the use of discounts and promotional codes.
- Provide express payment options like PayPal, Apple Pay, and similar methods.
Once all of these steps are complete, you can publish your shop. At that point, your commerce account may remain under review for a while, which is normal. The review status will show in the Commerce Manager, and you’ll receive an email if any extra action is required.
How to edit a Facebook Shop
Once your shop is live, you may need to update it. To make these changes, go to Commerce Manager, select Shops from the left-hand menu, and then click Edit shop. Keep in mind that you must already have products in your catalog to be able to edit your shop.
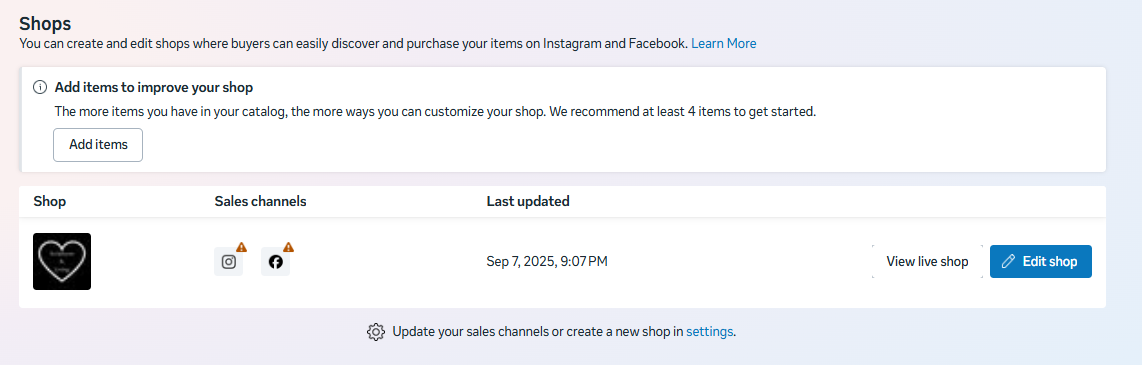
Inside the editor, you’ll find several customization options that let you refine the look and experience of your shop. You can:
- Add hero images to give your shop a powerful visual identity and set the first impression for visitors.
- Highlight offers so shoppers see discounts or promotions right away.
- Create collections to group products into categories or subcategories. For instance, if you sell women’s clothing, you might set up collections for summer dresses, winter wear, and innerwear to make browsing easier.
- Set up dynamic products, which automatically display items each customer is most likely to engage with based on their interests and activity.
- Use suggested collections, which are curated by Meta using your shop insights and catalog data to showcase products with higher chances of converting.
- Adjust shop navigation by adding menu items and choosing how collections and products appear in the Categories menu on your shop’s homepage.
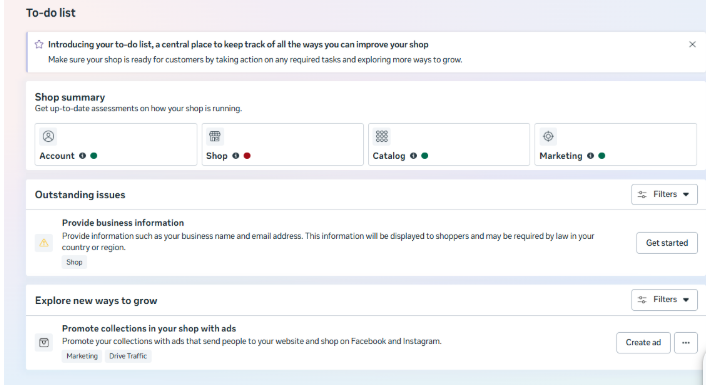
Always check the to-do list in your shop settings. Facebook marks completed items in green, so you’ll know if anything is still pending. Completing all tasks will keep your shop active and ensure shoppers have the best experience.
Connecting Facebook Shop to Instagram
To connect your shop, open the Commerce Manager and select your shop.
In the left-hand menu, click Settings, then choose Business assets.
Under the Sales channels section, you’ll see the option to connect new accounts. Here you can link your Instagram business account so your products are available on both platforms.
This section also allows you to disconnect accounts you no longer want linked and control your shop’s visibility. You can make your shop visible to the public or temporarily hide it if you need time to update products or policies.
When you connect an Instagram Business account to a Facebook Shop, you unlock features such as product tags on feed posts, stories, and reels, plus a dedicated View Shop button on your profile.
Best practices for using Facebook shop
1. Write titles and descriptions with the customer in mind
Your product descriptions and titles are your pitch. Don’t just state what the item is. Actually describe the features, highlight the benefits, and answer the questions customers are likely to ask, such as ‘What sizes are available?’
If I had to give one insider tip for someone just starting out, it would be this: don't assume your first catalog upload is 'done.’ You'll need to test it relentlessly. Swap out images, adjust product titles, try different descriptions, and track how each change affects click-throughs and conversions. The catalog is where profitability is won or lost.

eCommerce Manager, iBoost Online
2. Use high-quality images
Images should be at least 500 x 500 pixels and clear enough to stand out in crowded feeds. If you’re running Facebook catalog ads, a catalog enrichment platform like Cropink can help you customize backgrounds, add reviews, and insert text callouts so your products pop.
3. Organize products into collections
Instead of putting all items in one long list, create collections to make navigation easier. A fashion shop, for example, might separate summer dresses, winter coats, and accessories into distinct groups. Collections also make your ads more targeted and easier to manage.
4. Turn on automatic offers
Let Facebook do some of the heavy lifting by switching on automatic offers. When this feature is enabled, the system pulls in discounts it spots on your website or in your ads and displays them right inside your shop.
5. Localize your shop
When you’re selling across borders, don’t assume one setup fits all. Shoppers expect to see prices in their local currency, policies in their own language, and delivery options that actually apply to their country.
A customer in Paris shouldn’t be guessing whether your free shipping applies to them, just as someone in Sydney shouldn’t be stuck converting dollars in their head.
You can access the features for this under Settings> Localization.
6. Always use quality product data
Your Facebook Shop is only as reliable as the information inside it.
If your prices, stock levels, or images don’t match what’s on your website, customers will lose trust, and that often leads to canceled orders.
Consistency is the baseline.
Beyond that, the most profitable sellers use their catalog strategically, as HJ Matthews, Business Development Manager at Brain Jar, explains:
My fastest path to profitability is to set your Facebook Shop catalog to automatically exclude products that haven't sold in 45 days from your shop's "featured" section. Facebook's algorithm prioritizes featured items, so you want social proof working for you. Products with zero social engagement drag down your entire shop's performance in Facebook's system.

Business Development Manager at Brain Jar
7. Connect a pixel or SDK to your catalog
Adding a Meta pixel or SDK allows you to run Advantage+ catalog ads, which show shoppers the products most relevant to them based on their interests and behaviors.
However, collecting data is only part of the process. You must also know which metrics to pay attention to.
We recommend tracking:
- Repeat purchase rate by traffic source
- Add-to-cart rate
- Checkout initiation rate
- Return/refund rate
- Time to first purchase
- Product Performance Breakdown
8. Communicate fast to build trust
For many shoppers, a Facebook Shop might be their first interaction with your brand. If they reach out with a question and don’t hear back quickly, they’ll just move on to another seller.
On the other hand, a fast, personal reply can turn hesitation into a sale. Messenger and Instagram DMs are part of the sales funnel. Treat them that way.
Don't overlook the human side. Facebook Shops can feel scammy to buyers because of all the fake accounts out there. New sellers can build trust quickly by having clear business info visible, responding fast in Messenger, and pushing for reviews as early as possible. Quick, personalized replies through Messenger have closed more sales for my clients than any ad copy tweak. This means you will need dedicated sales staff to close deals through the chat function.
eCommerce Manager, iBoost Online
9. Win back hesitant shoppers
Cart abandonment is one of the biggest leaks in any eCommerce funnel, and Facebook Shops are no exception.
A shopper might love your product enough to add it to their cart, but doubts at checkout stop them from completing the purchase.
Unfortunately, many businesses just accept that drop-off as lost revenue. The most profitable stores, however, see it as an opportunity to start a conversation.
In Facebook Shops, Messenger makes that follow-up direct and personal. A quick check-in can answer questions, offer reassurance, or give a gentle nudge that brings the customer back.
“For faster profitability, I use what I call the 'Sicily Hospitality Method’. We immediately reach out to anyone who adds items to their Facebook Shop cart but doesn't complete a purchase. Within 2 hours, they get a personal call from one of our reps offering design guidance and answering questions. This recovered 34% of abandoned carts last quarter and built the personal relationships that drive our repeat business.” — Nino Russo Alesi, Acting CEO, Rattan Imports.
FAQs
Yes, Facebook Shops are free. The only costs you’ll incur are your usual advertising spend and any fees from your eCommerce platform or payment provider.
You create a shop inside the Commerce Manager. To start, log in through your Meta Business account, follow the prompts to set up your catalog, connect your Facebook Page, and submit your shop for review.
Approval depends on meeting Meta’s commerce eligibility requirements, such as being in an eligible country and having a trustworthy online presence. Once you submit your shop details, the review usually takes a few days, but it can take longer if Meta requests extra documents.
You can still create a shop without your own website by manually adding products into Commerce Manager. However, since native checkout is no longer supported, you’ll need to connect to a third-party checkout or eCommerce partner for transactions.
This usually happens if your Instagram business account hasn’t been connected to the Commerce Manager. Go to your shop settings, check Sales Channels, and link your Instagram account, and then your products will start appearing.
A Facebook Shop is a branded storefront linked to your business Page, where you control your catalog and presentation. Marketplace, on the other hand, is more like a classified ads section where anyone can list items, and it’s not personalized to your brand.
Final thoughts
We are living in an online world in every sense.
Your customers may visit physical storefronts every once in a while, but as technology advances, you can expect to see more of them shopping online.
One of the social media platforms at the top of that list is Facebook.
As such, it’s critical that you set up your Facebook Shop and ensure you’ve optimized it properly. This guide is a good start, but we have also included some more resources from Meta at the bottom.
Once you have your shop in place, Cropink can help you create on-brand, high-converting catalog ads that stand out in the Facebook feed.
If you want to learn how, check out cropink.com.
Sources
Damaris is a Digital Marketing Specialist who writes about digital marketing and performance marketing. At Cropink, she creates data-driven content to help businesses run better ad campaigns for better performance and ROI.
Leszek is the Digital Growth Manager at Feedink & Cropink, specializing in organic growth for eCommerce and SaaS companies. His background includes roles at Poland's largest accommodation portal and FT1000 companies, with his work featured in Forbes, Inc., Business Insider, Fast Company, Entrepreneur, BBC, and TechRepublic.
Related Articles


How Can Cropink Help?
Start with Cropink is easy and free
No credit card required